“Barrel installation made easy with our step-by-step guide for your AR15”
Tools Needed for AR15 Barrel Installation
When it comes to installing a new barrel on your AR15, having the right tools is essential to ensure a smooth and successful process. In this article, we will discuss the tools needed for AR15 barrel installation and provide a step-by-step guide to help you through the process.
One of the most important tools you will need for AR15 barrel installation is a barrel nut wrench. This specialized tool is designed to fit the specific dimensions of the barrel nut on your AR15 and will allow you to properly tighten it to the correct torque specifications. Without a barrel nut wrench, you may risk damaging the barrel nut or not tightening it enough, which can lead to accuracy issues and potential safety hazards.
In addition to a barrel nut wrench, you will also need a torque wrench to ensure that the barrel nut is tightened to the proper specifications. Over-tightening the barrel nut can cause damage to the threads on your upper receiver, while under-tightening can lead to a loose barrel that affects accuracy. A torque wrench will allow you to tighten the barrel nut to the manufacturer’s recommended torque setting, ensuring a secure and reliable fit.
Another essential tool for AR15 barrel installation is a vise block. This tool is used to securely hold your upper receiver in place while you work on installing the barrel. Without a vise block, it can be challenging to properly align the barrel and barrel nut, leading to potential issues with accuracy and function. A vise block will provide stability and support, making the installation process much easier and more precise.
Additionally, you will need a set of punches to help remove the gas block and gas tube from your AR15. These tools are essential for disassembling your rifle and accessing the barrel for installation. A set of punches will allow you to safely and effectively remove the gas block and gas tube without causing damage to your rifle or components.
Finally, you may also need a strap wrench or armorers wrench to help with removing the flash hider or muzzle device from your AR15. These tools are designed to provide the necessary leverage and grip to loosen and remove the flash hider, allowing you to access the barrel for installation. Without a strap wrench or armorers wrench, it can be challenging to remove the flash hider, potentially causing damage to your rifle or components.
In conclusion, having the right tools for AR15 barrel installation is essential to ensure a successful and smooth process. A barrel nut wrench, torque wrench, vise block, punches, and a strap wrench or armorers wrench are all essential tools that will help you properly install a new barrel on your AR15. By using these tools and following a step-by-step guide, you can confidently install a new barrel on your AR15 and enjoy improved accuracy and performance.
Preparing the Upper Receiver for Barrel Installation
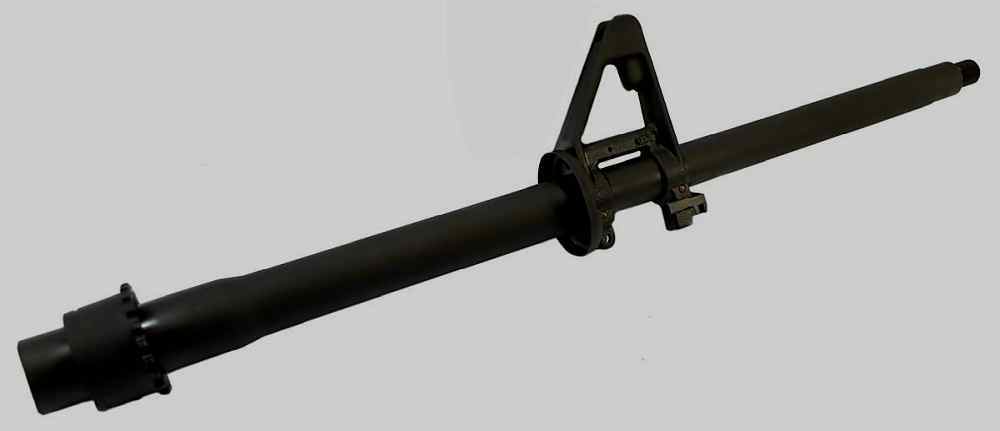
The AR15 is a popular rifle known for its versatility and customization options. One of the key components of the AR15 is the barrel, which plays a crucial role in determining the rifle’s accuracy and performance. Installing a new barrel on an AR15 can seem like a daunting task, but with the right tools and knowledge, it can be a straightforward process.

Before you begin the barrel installation process, it’s important to prepare the upper receiver. Start by removing the upper receiver from the lower receiver and laying it on a flat surface. Make sure the upper receiver is clean and free of any debris or obstructions that could interfere with the installation process.
Next, remove the handguard and any other accessories that may be attached to the upper receiver. This will give you better access to the barrel nut and barrel extension, making it easier to install the new barrel. Use a wrench or armorer’s tool to loosen the barrel nut and remove it from the upper receiver.
Once the barrel nut is removed, carefully slide the old barrel out of the upper receiver. Be sure to support the barrel as you remove it to prevent any damage to the upper receiver or barrel extension. Inspect the barrel extension for any signs of wear or damage, as this could affect the performance of the new barrel.
With the old barrel removed, it’s time to install the new barrel. Start by applying a small amount of grease to the barrel extension to ensure a smooth fit. Carefully slide the new barrel into the upper receiver, making sure it aligns properly with the barrel extension. Once the barrel is in place, reattach the barrel nut and tighten it securely with a wrench or armorer’s tool.
After the barrel nut is tightened, reattach the handguard and any other accessories that were removed earlier. Make sure everything is securely fastened and aligned properly before moving on to the next step in the installation process.
Preparing the upper receiver for barrel installation is an important step in ensuring the new barrel fits properly and functions correctly. By following these steps and taking your time to carefully install the new barrel, you can improve the performance and accuracy of your AR15 rifle.
In conclusion, the AR15 barrel installation process may seem intimidating at first, but with the right tools and knowledge, it can be a straightforward task. By preparing the upper receiver properly and following a step-by-step guide, you can successfully install a new barrel on your AR15 rifle. Remember to take your time, double-check your work, and seek help from a professional if needed. With a little patience and attention to detail, you can upgrade your AR15 rifle with a new barrel and enjoy improved performance on the range.
Installing the Barrel into the Upper Receiver
The AR15 is a popular firearm known for its versatility and customization options. One key component of the AR15 is the barrel, which plays a crucial role in determining the accuracy and performance of the rifle. Installing a new barrel into the upper receiver of an AR15 can seem like a daunting task, but with the right tools and knowledge, it can be a straightforward process.
Before beginning the barrel installation process, it is important to gather all the necessary tools and materials. You will need a barrel vise, a barrel nut wrench, a torque wrench, and a set of punches. Additionally, make sure to have some anti-seize lubricant on hand to ensure smooth installation.
The first step in installing the barrel is to secure the upper receiver in a barrel vise. This will provide stability and prevent any damage to the receiver during the installation process. Once the upper receiver is securely in the vise, remove the old barrel by using a barrel nut wrench to loosen the barrel nut. Be sure to keep track of any shims or washers that may be present.
With the old barrel removed, it is time to prepare the new barrel for installation. Apply a small amount of anti-seize lubricant to the threads of the barrel extension to prevent galling and ensure a smooth installation. Carefully slide the barrel into the upper receiver, making sure that the barrel extension lines up with the receiver extension.
Next, install the barrel nut onto the threads of the barrel. Use a barrel nut wrench to tighten the nut, making sure to align the gas tube hole in the nut with the hole in the upper receiver. It is important to torque the barrel nut to the manufacturer’s specifications to ensure proper alignment and function.
Once the barrel nut is properly torqued, install the gas block and gas tube onto the barrel. Use a set of punches to secure the gas block in place, making sure that it is aligned with the gas port on the barrel. Finally, install the handguard onto the barrel and upper receiver, making sure that it is properly aligned and secured.
With the barrel installed and all components properly aligned, the final step is to function test the rifle. Check for proper cycling of the bolt carrier group and ensure that the gas system is functioning correctly. If everything is in working order, your AR15 is now ready for use.
In conclusion, installing a new barrel into the upper receiver of an AR15 is a straightforward process that can be completed with the right tools and knowledge. By following this step-by-step guide, you can ensure a smooth and successful barrel installation. Remember to take your time, double-check your work, and always follow the manufacturer’s specifications for torque and alignment. With a little patience and attention to detail, you can upgrade your AR15 with a new barrel and enjoy improved accuracy and performance on the range.
Securing the Barrel Nut and Gas Block
When it comes to installing a barrel on an AR15, there are several important steps to follow to ensure that the process goes smoothly. In this guide, we will focus on securing the barrel nut and gas block, two critical components of the AR15 that play a key role in the firearm’s performance.
First and foremost, it is important to make sure that you have all the necessary tools and equipment on hand before you begin the installation process. This includes a torque wrench, barrel nut wrench, gas block alignment tool, and any other tools specific to your particular AR15 model.
Once you have gathered all of your tools, the first step in securing the barrel nut is to apply a small amount of grease to the threads of the barrel extension. This will help to prevent the barrel nut from seizing up during installation and make it easier to tighten down properly.
Next, slide the barrel into the upper receiver and hand tighten the barrel nut onto the threads of the barrel extension. Use the barrel nut wrench to tighten the nut down until it is snug against the upper receiver. Be sure to check the alignment of the gas tube hole in the barrel nut with the hole in the upper receiver to ensure that they are properly aligned.
Once the barrel nut is tightened down, use the torque wrench to apply the proper amount of torque to the nut. The specific torque value will vary depending on the manufacturer of your AR15, so be sure to consult your owner’s manual for the correct torque specifications.
After securing the barrel nut, the next step is to install the gas block. Start by sliding the gas block onto the barrel and aligning it with the gas port in the barrel. Use the gas block alignment tool to ensure that the gas block is properly aligned with the gas port.
Once the gas block is aligned, use the set screws or pins provided with the gas block to secure it in place. Be sure to tighten down the screws or pins evenly to prevent any movement of the gas block once it is installed.
Finally, check the alignment of the gas tube with the gas block and barrel nut to ensure that everything is properly aligned. If necessary, make any adjustments to the gas block or barrel nut to ensure that the gas tube is straight and properly aligned.
In conclusion, securing the barrel nut and gas block are critical steps in the installation process of an AR15 barrel. By following the steps outlined in this guide and using the proper tools and equipment, you can ensure that your AR15 is properly assembled and ready for use. Remember to always consult your owner’s manual for specific instructions and torque specifications to ensure that your AR15 functions properly and safely.
Final Steps and Function Check for AR15 Barrel Installation
Now that you have successfully installed the barrel on your AR15, it’s time to move on to the final steps and perform a function check to ensure everything is in working order. This is a crucial part of the process to ensure the safety and reliability of your firearm.
First, make sure that the barrel is properly aligned and secured in place. Check for any signs of misalignment or loose screws that could affect the performance of your AR15. Tighten any screws or bolts as needed to ensure a snug fit.
Next, check the gas block and gas tube to make sure they are properly installed and aligned with the barrel. The gas block should be securely attached to the barrel and the gas tube should be free of any obstructions. This is essential for the proper functioning of your AR15.
Once you have confirmed that the barrel, gas block, and gas tube are all in place, it’s time to perform a function check. This involves testing the various components of your AR15 to ensure they are working correctly.
Start by checking the safety selector to make sure it moves smoothly and locks into place in the safe and fire positions. Next, test the trigger to ensure it functions properly and resets after each pull. Make sure there is no excessive play or sticking in the trigger mechanism.
After checking the safety selector and trigger, move on to testing the bolt carrier group. Cycle the bolt to ensure it moves freely and locks into place when the charging handle is pulled back. Check for any signs of wear or damage on the bolt carrier group that could affect its performance.
Once you have tested the safety selector, trigger, and bolt carrier group, it’s time to check the magazine release and ejection port. Make sure the magazine releases smoothly and the ejection port is clear of any obstructions. Test the ejection port by cycling the bolt carrier group and checking for proper ejection of spent casings.
Finally, perform a function check by loading a magazine with dummy rounds and cycling the bolt carrier group to test the feeding and ejection of rounds. Make sure the rounds feed smoothly from the magazine into the chamber and eject properly after firing.
If everything checks out during the function test, congratulations! You have successfully installed the barrel on your AR15 and performed a thorough function check to ensure its reliability and safety. Remember to always follow proper safety procedures when handling firearms and consult a professional gunsmith if you encounter any issues during the installation process. With proper care and maintenance, your AR15 will provide you with years of reliable performance on the range or in the field.


