“Master your AR15 with expert gas block repairs.”

Replacing a Damaged Gas Block on an AR15
If you own an AR15 rifle, you know how important it is to keep it in top working condition. One of the key components of the AR15 is the gas block, which plays a crucial role in regulating the flow of gas from the barrel to cycle the action of the rifle. Over time, the gas block can become damaged or worn out, leading to issues with the rifle’s performance. In this article, we will discuss how to replace a damaged gas block on an AR15, so you can keep your rifle in peak operating condition.

Before we get started, it’s important to gather all the necessary tools and materials for the job. You will need a set of punches, a hammer, a torque wrench, a vise block, a barrel nut wrench, and a replacement gas block. Make sure you have a clean, well-lit workspace to work in, and take your time to ensure that each step is done correctly.
The first step in replacing a damaged gas block is to remove the handguard from the rifle. This will give you access to the gas block and allow you to work on it more easily. Use the appropriate tools to remove the handguard, being careful not to damage any of the components.
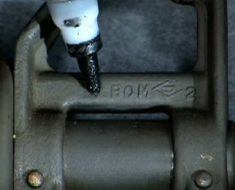
Once the handguard is removed, you can begin to remove the gas block from the barrel. Use the vise block to secure the barrel in place, and then use the appropriate tools to remove the screws or pins holding the gas block in place. Be sure to keep track of all the screws and pins so you can reassemble the rifle correctly later on.

With the gas block removed, you can now install the new gas block. Make sure the replacement gas block is the correct size and type for your rifle, and that it is compatible with your barrel. Use the torque wrench to tighten the screws or pins holding the gas block in place, being careful not to over-tighten them.
Once the new gas block is installed, you can reassemble the rifle by putting the handguard back on. Make sure everything is lined up correctly and that all the screws are tightened securely. Once the rifle is reassembled, you can test it to ensure that the new gas block is functioning properly.
Replacing a damaged gas block on an AR15 can be a challenging task, but with the right tools and a little patience, you can do it yourself. By following the steps outlined in this article, you can keep your AR15 in top working condition and ensure that it performs reliably every time you use it.
In conclusion, mastering the mechanics of AR15 gas block repairs is an important skill for any rifle owner. By following the steps outlined in this article, you can replace a damaged gas block on your AR15 and keep your rifle in peak operating condition. Remember to take your time, use the right tools, and pay attention to detail to ensure that the job is done correctly. With a little practice, you can become proficient at repairing and maintaining your AR15, so you can enjoy using it for years to come.

Upgrading Your AR15 Gas Block for Improved Performance
If you’re a proud owner of an AR15 rifle, you know how important it is to keep your firearm in top-notch condition. One crucial component of your AR15 is the gas block, which plays a key role in regulating the flow of gas from the barrel to cycle the action. Over time, your gas block may become worn or damaged, leading to decreased performance and reliability. Fortunately, with a little know-how and some basic tools, you can easily repair or upgrade your AR15 gas block to ensure optimal performance.
Before diving into the repair process, it’s important to understand the different types of gas blocks available for your AR15. The most common types are low-profile gas blocks, which are designed to fit under the handguard of your rifle, and adjustable gas blocks, which allow you to fine-tune the gas flow for improved performance. Depending on your specific needs and preferences, you can choose the gas block that best suits your rifle.
When it comes to repairing or upgrading your gas block, the first step is to disassemble your AR15 and remove the handguard to access the gas block. Once you have exposed the gas block, carefully inspect it for any signs of wear or damage, such as cracks or corrosion. If you notice any issues, it’s best to replace the gas block entirely to ensure optimal performance.
If you’re looking to upgrade your gas block for improved performance, consider investing in an adjustable gas block. Adjustable gas blocks allow you to fine-tune the gas flow to your rifle, which can help reduce recoil, improve accuracy, and increase reliability. With an adjustable gas block, you can customize your AR15 to suit your shooting style and preferences.
To install a new gas block, start by removing the old gas block and cleaning the area around the gas port on the barrel. Next, slide the new gas block onto the barrel and align it with the gas port. Use a set of roll pin punches to secure the gas block in place with the roll pin provided. Be sure to double-check the alignment of the gas block to ensure proper function.
Once the new gas block is installed, reassemble your AR15 and test fire it to ensure everything is functioning properly. If you notice any issues, such as cycling problems or gas leaks, double-check the installation of the gas block and make any necessary adjustments.
In conclusion, mastering the mechanics of AR15 gas block repairs is essential for maintaining the performance and reliability of your rifle. Whether you’re looking to repair a damaged gas block or upgrade to an adjustable gas block for improved performance, with the right tools and know-how, you can easily tackle this task. By taking the time to properly maintain your AR15 gas block, you can ensure that your rifle performs at its best every time you pull the trigger.
Troubleshooting Common Gas Block Issues on an AR15
If you own an AR15 rifle, you know how important it is to keep it in top working condition. One of the key components of an AR15 is the gas block, which plays a crucial role in regulating the flow of gas from the barrel to cycle the action. However, like any mechanical part, gas blocks can sometimes experience issues that need to be addressed. In this article, we will discuss some common gas block issues on an AR15 and how to troubleshoot and repair them.
One of the most common issues with AR15 gas blocks is gas leakage. This can occur due to a variety of reasons, such as a loose gas block, a damaged gas tube, or a faulty gas block seal. If you notice gas leaking from your gas block, the first step is to inspect the gas block and gas tube for any visible damage. If you find any cracks or other signs of damage, you will need to replace the affected parts.
Another common issue with AR15 gas blocks is gas block misalignment. This can occur if the gas block is not properly aligned with the gas port on the barrel, which can result in poor cycling and reliability issues. To check for gas block misalignment, you can use a straight edge to ensure that the gas block is parallel to the barrel. If you find that the gas block is misaligned, you will need to adjust it to ensure proper alignment.
In some cases, AR15 gas blocks can become clogged with carbon buildup, which can impede the flow of gas and cause cycling issues. To address this issue, you can remove the gas block and gas tube from the rifle and clean them thoroughly with a solvent and brush. Be sure to pay special attention to the gas port on the barrel, as this is where carbon buildup is most likely to occur. Once the gas block and gas tube are clean, reassemble them and test the rifle to ensure proper function.
If you are experiencing issues with your AR15 gas block but are unsure of the cause, it may be helpful to consult a professional gunsmith for assistance. A gunsmith will have the knowledge and expertise to diagnose and repair any issues with your gas block, ensuring that your rifle is functioning properly.
In conclusion, mastering the mechanics of AR15 gas block repairs is essential for keeping your rifle in top working condition. By understanding common gas block issues and how to troubleshoot and repair them, you can ensure that your AR15 is reliable and accurate when you need it most. Remember to regularly inspect and maintain your gas block to prevent issues from arising, and don’t hesitate to seek professional help if you encounter any issues that you are unable to resolve on your own. With proper care and maintenance, your AR15 will continue to serve you well for years to come.
Installing a Low-Profile Gas Block on Your AR15
If you’re a gun enthusiast or a seasoned shooter, you know the importance of keeping your AR15 in top condition. One crucial component of your AR15 is the gas block, which plays a vital role in regulating the flow of gas from the barrel to the bolt carrier group. Over time, your gas block may become damaged or worn out, requiring you to replace it with a new one. In this article, we’ll walk you through the process of installing a low-profile gas block on your AR15, so you can keep your rifle in peak operating condition.
Before you begin the installation process, it’s essential to gather all the necessary tools and materials. You’ll need a set of hex keys, a torque wrench, a vise block, a punch set, and a rubber mallet. Additionally, you’ll need a low-profile gas block that is compatible with your AR15 model. Once you have everything you need, you can start the installation process.
The first step in installing a low-profile gas block is to remove the handguard and the gas tube from your AR15. Use a hex key to loosen the screws holding the handguard in place, then carefully slide it off the barrel. Next, use a punch set to push out the roll pin holding the gas tube in place. Once the gas tube is removed, you can proceed to the next step.
With the handguard and gas tube removed, you can now focus on removing the old gas block from your AR15. Use a vise block to secure the barrel in place, then use a rubber mallet to gently tap the old gas block off the barrel. Be careful not to damage the barrel or any other components of your AR15 during this process. Once the old gas block is removed, you can proceed to install the new low-profile gas block.
Before installing the new gas block, make sure to clean the barrel and gas port thoroughly to remove any debris or residue. Once the barrel is clean, slide the new gas block onto the barrel and align it with the gas port. Use a torque wrench to tighten the set screws on the gas block to the manufacturer’s specifications. Be sure not to over-tighten the screws, as this could damage the gas block or the barrel.
After the new gas block is securely in place, you can reattach the gas tube to the gas block. Use a punch set to insert the roll pin back into the gas block to secure the gas tube in place. Once the gas tube is reattached, you can reinstall the handguard onto your AR15.
With the new low-profile gas block installed, your AR15 is now ready for action. Remember to test fire your rifle to ensure that the gas block is functioning correctly. If you encounter any issues, double-check your installation and make any necessary adjustments.
In conclusion, installing a low-profile gas block on your AR15 is a straightforward process that can be completed with the right tools and a bit of patience. By following the steps outlined in this article, you can keep your AR15 in peak operating condition and ensure that it performs reliably every time you take it to the range. Mastering the mechanics of your AR15 will not only enhance your shooting experience but also prolong the life of your rifle.
Understanding the Function of the Gas Block in an AR15
If you own an AR15 rifle, you know how important it is to keep it in top working condition. One crucial component of the AR15 is the gas block, which plays a key role in the rifle’s operation. Understanding how the gas block works and knowing how to repair it when necessary is essential for any AR15 owner.
The gas block is a small but vital part of the AR15’s gas system. It is located near the front of the rifle, just behind the muzzle. The gas block is responsible for regulating the flow of gas from the barrel to the bolt carrier group, which cycles the action of the rifle. When the rifle is fired, gas is tapped from the barrel and directed through a gas tube into the gas block. The gas block then directs the gas into the bolt carrier group, causing it to cycle and chamber a new round.
Over time, the gas block can become dirty or damaged, leading to malfunctions in the rifle’s operation. Common issues with the gas block include carbon buildup, corrosion, and misalignment. If you notice that your AR15 is not cycling properly or is experiencing other performance issues, it may be time to inspect and repair the gas block.
To repair the gas block, you will need a few basic tools and some knowledge of the AR15’s gas system. Start by removing the handguard and gas tube from the rifle to access the gas block. Inspect the gas block for any signs of damage or wear, such as cracks or corrosion. If the gas block is dirty, use a cleaning solvent and a brush to remove any carbon buildup.
If the gas block is damaged beyond repair, you may need to replace it with a new one. There are many aftermarket gas blocks available for the AR15, so be sure to choose one that is compatible with your rifle’s barrel and gas system. When installing the new gas block, be sure to align it properly with the gas port on the barrel to ensure proper gas flow.
Once the new gas block is installed, reassemble the rifle and test fire it to ensure that it is cycling properly. If you continue to experience issues with the gas block, you may need to seek the help of a professional gunsmith.
In conclusion, mastering the mechanics of the AR15 gas block is essential for any AR15 owner. By understanding how the gas block works and knowing how to repair it when necessary, you can keep your rifle in top working condition. Remember to inspect the gas block regularly for signs of damage or wear, and be prepared to replace it if needed. With proper maintenance and care, your AR15 will continue to perform reliably for years to come.